30 Tips and Tricks for your Sony Alpha A7RIV | Diogo Oliveira onWILD
- Diogo Oliveira

- Feb 9, 2024
- 22 min read

As soon as we buy a new camera, most of us are so excited to start using it and enhance our creative process right away... but this process can also be frustrating. Getting to know and learn the entire menu, features, and functions is challenging, especially if we're switching from another system or a completely different brand. Whether you're an experienced Sony photographer or new to the Sony family, setting up a new camera and ensuring it functions to meet our needs as photographers can be daunting. That's why I created this setup guide! This guide is for those like me who switched systems to one of the best cameras, the Sony A7R IV, and therefore find themselves in the same situation. This post follows the one previously made about the Sony A7R III.
With the release of the highly anticipated Sony a7R IV 61MP mirrorless camera, many photographers will want to quickly set up their new camera so they can head out into the field and start using it as soon as possible. The Sony A7R IV has the same menu system as the Sony A7R III, so the transition was relatively easy, however, if you're coming from another system then this guide is ideal. The decision to create this little guide is so you can fully enjoy your Sony A7R IV, or another similar model that has the same menu, like the Sony A7R III, Sony A7 III, and the Sony A6600. I've been using the Sony A7R IV for over a year now and have explored the camera in various real-life situations, inevitably setting up and customizing the camera to my liking. The idea was never to create a comprehensive review, discussing what I like or don't like, but rather to create a mini-guide to help reduce the learning curve when it comes to setting up the camera so you can focus more on taking photos and less on settings.
The images are in English because it's difficult to capture the LCD with the desired quality to be visible. If anyone has a solution, I'm willing to try and update this post. If you have the camera in English, you can follow along with the images. I hope you enjoy this guide. As always, if you have any questions, leave them in the comments below and I'll be happy to answer.
INITIAL SETUP
After taking the camera body out of the box and charging the battery, many of you must be eager to start taking photos. At least I was! But before taking the first photos, there are several basic settings that you should adjust. Although these settings may not be "game-changing" in terms of your experience with this camera, A7R IV, they are still important.
Setting region and time
When you turn on the camera for the first time, you will be greeted with an option to choose the language. You should choose the one that best suits your knowledge; I like to have all cameras in English. After choosing the language, it's time to select your region, date, and time. Although most photographers do this initial setup and never think about it again, the truth is that if you use multiple cameras like I do, you can imagine the headache this issue can become. Especially when we travel to other regions. You must ensure that all your cameras have the same date and time, and make the necessary changes whenever you travel. This way, you can ensure that when you're in your editing/organizing program, like Adobe Lightroom or another, your photos taken by different cameras are perfectly aligned temporally.


After the initial setup, these features can be found in the 'Setup5' Menu (5/7), respectively 'Date/Time Setup' and 'Area Setting'.
Choose RAW or JPEG
In addition to choosing the language and setting the date and time, the first setting most photographers make is to check if they are shooting in the image format they want. By default, most cameras come set up to shoot in JPEG. Personally (and professionally), I prefer shooting in RAW to have access to all the information of the photograph captured by the incredible sensor inside the Sony A7R IV.


However, I must point out that we can still choose the type of RAW file we want with the A7R IV: Compressed or Uncompressed. By default, the selected file format is Compressed, which essentially is a smaller RAW file (60mb vs. 120mb) but is considered a 'lossy' file because it uses an algorithm that helps reduce the size of the RAW file. This algorithm removes some of the information considered unnecessary or redundant while providing a photograph that can still be edited to our personal taste. The Uncompressed format does not use any algorithm, thus being a pure and lossless RAW file. The difference between both is insignificant in 95% of cases; however, if you shoot in situations with high contrast, such as astrophotography or night photography, then I recommend using the Uncompressed RAW format.


Both settings can be found in the first menu, 'Quality/Image Size1'.
Turn off Long Exposure Noise Reduction, High ISO Noise Reduction, and Auto DRO/HDR
Although Sony does a good job providing efficient resources and settings in its cameras, when it comes to noise reduction and HDR, I prefer to control everything in post-production. For this reason, I always turn off Long Exposure Noise Reduction, High ISO Noise Reduction (only with JPEG), and Auto HDR (which will artificially increase the dynamic range). Each of these settings is active by default on the A7R IV; however, if you are not comfortable with post-production techniques to reduce noise or with HDR, you can leave some of them on to help you.


These settings can be found in the second and twelfth menus of the first tab, i.e., 'Quality/Image Size2' (2/15) and 'Color/WB/Image Processing' (12/15).
Choose Color Space
By default, the A7R IV comes with the color space set to sRGB, which is the most commonly used color space and is accepted by the vast majority of websites and almost all smartphones and tablets. However, this color space does not have a large color profile, meaning it does not capture the different variations within the same color as other Color Spaces. For example, if the destination of your photos is print, you should instead use the AdobeRGB Color Space as it contains a wider range of colors. Although it is not a big problem if you are shooting in RAW, it may be one less detail to change when you are editing photos. What I recommend is to choose the Color Space that best suits the final destination of your photos, just don't forget to choose the correct one when printing or sharing an image.

This setting can be found in the 'Quality/Image Size2' menu (2/14).
Set up Auto Bracketing
If you like to shoot landscapes or if you're a travel photographer looking for photos with a wider dynamic range to have more data for each photo, then you'll like to use the bracketing feature, i.e., capturing multiple images of the same scene but with different exposures. You should only make small adjustments to the bracket and shooting mode settings. As you know, it's always recommended to use a tripod for this type of photography.
First, let's change the bracket settings in the 'Photography Mode/Advance1' menu (3/14), and you should change the 'Bracket auto timer' from 'Off' to '2 sec.', and then it's more of a personal choice, I like to change the 'bracket order' from '0 → - → +' to '- → 0 → +'.


We should also change the settings of the 'Drive Mode' or shooting mode. Scroll down until you see 'BRK C - 0.3EV3' and press right or left with the Control Wheel until you see 'BRK C - 2.0EV3'. This setting will allow you to take 3 bracketed photos with 2 stops difference between each image, which is my favorite for when I do bracketing. By setting the timer to 2 seconds and choosing this shooting mode, the A7R III will quickly take the three photos without pausing in between.
These settings can be found in the 'Photography Mode/Advance1' menu (3/14).
Take Advantage of Memory Recall Features
A feature of the Sony A7R IV sometimes forgotten by many photographers is the ability to save camera settings in custom modes labeled 1, 2, and 3. This ability is quite useful when shooting a wide variety of situations frequently. In my case, I have one mode for shooting birds in flight and the other two for recording videos, each with very different settings.
To register new settings in this function, you must first fully configure your camera to reflect the settings you want to save. This includes ISO, aperture, and shutter speed, but also the camera mode, whether manual or one of the priority modes. Almost all settings will be saved, including autofocus settings, so you must make sure to adjust everything as you really need it. When you're ready, just go to the menu system in the "Camera Tab 1" and go to the third page of the menu. Here you will find the choice "MR 1/2 Memory" at the bottom of the page. Once inside this setting, all you need to do is select 1, 2, or 3 on the screen menu and press the selection button (in the middle of the rear wheel near the rear LCD). This will save the previously set settings in the number you selected.


To access these settings, simply change the camera mode dial at the top to the number you want, and all the saved settings should appear on the camera. Note that M1, M2, M3, and M4 can also be used to save your settings, however, these are saved on your SD card. If you end up changing or formatting the card, all these settings will be deleted, not being one of the aspects that I recommend using.
AF with Shutter
One of the best settings you can find on the A7R IV is the dedicated back focus button on the camera, in terms of ergonomics and button layout. The idea of the back focus button is very simple. The shutter button at the front of the camera is set to only take the photo, while the button on the back is dedicated to focusing. By separating the two functions, it is possible to react much faster and take the photo, that is, without accidentally pressing the shutter button and the camera focusing on another subject in the background and ending up missing the desired photo. Focus is exclusively performed by the rear button.


The 'AF-ON' button comes configured by default for the function we want, however, we have to set the 'AF with shutter' function from 'On' to 'Off' so that focusing is no longer done by the shutter button. This function is found in the 'AF2' menu (6/15).
Eye Autofocus Technology
Face/eye autofocus is one of the best features found in almost all Sony mirrorless cameras, although it is sometimes underestimated. It works simply by changing the focus type we choose to quickly search for and keep a human face or eye focused. This focus system will continuously track and focus on the eye even if the subject moves through the scene, increasing the likelihood of having that photo with the person's eyes focused.

But how can you take advantage of this technology? The best solution is to set up a button to facilitate its use. By default, the central button in the middle of the rear control wheel on the back of the camera is set to start Eye Autofocus, however, I think it's not the most natural location for a focusing button. There are two solutions, either set the 'AEL' button or press the joystick because both are relatively close to the 'AF-ON' focusing button, which you probably already use to focus naturally. If neither of these works, you can still set the focus hold button that exists on the sides of most Sony lenses. This button can also be customized and configured as desired, although many do not know it.


Personally, I prefer to have eye focus on the 'AEL' button, this setting can be changed in the 'Custom Operation1' menu (9/11), and then in the 3rd table of 'Custom Key'.
Change Peaking Settings
If you sometimes have to shoot in manual focus, then you should use one of the best features of the A7R IV, which is the Peaking Setting (or 'Focus Peaking'). As soon as you switch to Manual Focus on the lens (MF), a color overlay will appear on your image when subjects begin to come into focus, making the whole process easier when you're trying to get sharp images.


For the best results, I recommend setting the 'Peaking Level' to 'Medium', you should have the following settings: 'Peaking Display': On | 'Peaking Level': 'Medium' | 'Peaking Color': 'Red'. These settings can be found in the 'Focus Assist' menu (14/15).
Turn off Automatic Brightness
One of the settings we should pay more attention to is the brightness of the LCD and viewfinder. The camera comes by default with 'Monitor Brightness' set to 'Sunny Weather' (automatic). This means that the monitor brightness may vary depending on the light conditions. In mirrorless cameras, we usually use the monitor more than the viewfinder, and this monitor should show us the final result according to the exposure and aperture set and is one of the benefits of using it (except in low light situations or when using flash). If this setting is on automatic, the scene being photographed may appear brighter than the final RAW file, and this may lead us to make some compensation errors.

The best solution is to change the mode to 'Manual' and leave it at '+-0'. This way, the final result will be the closest to what is displayed on the monitor. This setting can be found in the 'Setup1' menu (1/7).
Define display quality as high.
If you want to maximize the resolution of the rear LCD, you should change the "Display Quality" from "Standard" to "High." According to Sony, this may cause slightly faster battery consumption, but I haven't noticed any difference and have this setting enabled on all my Sony cameras.


The display quality settings can be found in the "Setup2" menu (2/7).
Increase Photo Viewer Speed Rate
For both the viewfinder and the LCD, it's ideal to increase the 'Display Quality' to 'High.' This will enhance the displayed resolution, allowing you to see much more detail and texture, especially for macro shots where you want to see every focused detail. You can also adjust the frame rates in 'Frame rate photo. visor' to 'High.' This will greatly help when trying to capture fast-moving subjects, such as birds in flight. If you want to increase the refresh rate of the viewfinder so that moving subjects appear smoother, you'll need to set the photo viewer speed rate to High. Note that by doing this, the screen resolution will slightly decrease to compensate for the faster refresh rate. This only affects the Viewfinder and will not affect the rear LCD screen.


This setting can be found in the "Display/Auto Review1" menu (7/11).
Main Movie Settings
It's easy to forget to adjust video settings, but I recommend taking a look at what you can select. The idea is to save time when you're out and about and decide to shoot some b-roll without preparation. First, I would change the exposure mode to the one that works best for you. I prefer manual mode so I can fully control the exposure of my videos. Then you should change the file format to be able to record in 4K. Finally, choose the most appropriate recording setting. Here you can choose to shoot at 30p, which is standard for internet videos, or 24p for a more cinematic and professional look. You should also choose the bit rate, between 100 or 60. The higher the bit rate, the more data will be captured with each shot, which will increase the file size.
All these settings can be found in the "Movie1" menu (1/1).


It's also worth checking out Sony's S&Q Movie mode (slow and quick). In S&Q mode, you can record videos at high frame rates, such as 120fps at 1080p, which creates a slow-motion effect.


Movie Button Functionality
In the past, there have been times when I accidentally pressed the movie start/stop button while out in the field, only realizing the mistake several minutes later, mostly after recording more than 30 minutes of 4K video and ending up with a drained battery. To ensure this never happens, you should change the Movie Button setting to Movie Only mode so that it only functions when you're in Video mode.


This setting can be found in the "Custom Operation2" menu (10/11).
Selecting Automatic ISO and Minimum Auto ISO Value
Another handy feature in the A7R IV is using automatic ISO. When shooting in Manual, Shutter Priority, or Aperture Priority modes (both in photos and videos), you have the option to select automatic ISO, so the camera chooses the best ISO for that scene. This feature is extremely useful when shooting in places where light constantly changes, such as street photography or wildlife photography.

Now, to really take advantage of this feature, you should also set the 'Minimum Auto ISO.' To change this setting, you must be in Aperture Priority mode (the mode with the 'A' icon on the mode dial on top). In this mode, you can choose the minimum speed that the camera will reach before turning on the Auto ISO feature. How does this work? Let's imagine you're shooting in Aperture Priority mode while strolling through your hometown. Along your route, the light varies on your subjects, sun, shade, sun. But by setting the 'Minimum Auto ISO' to 1/125 sec., you're telling the camera that if the shutter speed never drops below 1/125 sec., then your ISO of 100 won't be changed. But if you suddenly choose to photograph a subject in the shade or with little light, the camera will increase the ISO to maintain that shooting speed, ensuring that the shutter speed never drops below the speed you set and avoiding blurry photos in the process.

Both settings can be found in the 'Exposure1' menu (9/15).
Setting up Multi SD Card Workflow
One of the most requested settings was support for multiple SD cards. However, since there are several recording possibilities for one of the two cards or both, you should define what kind of workflow you want. Many prefer that everything captured by card 1 (the fastest with UHS II) is automatically copied to card 2. There's also the option to separate RAW/JPEG or photos/videos or only copy photos (or videos) to the backup card. As you can see, there are several options.
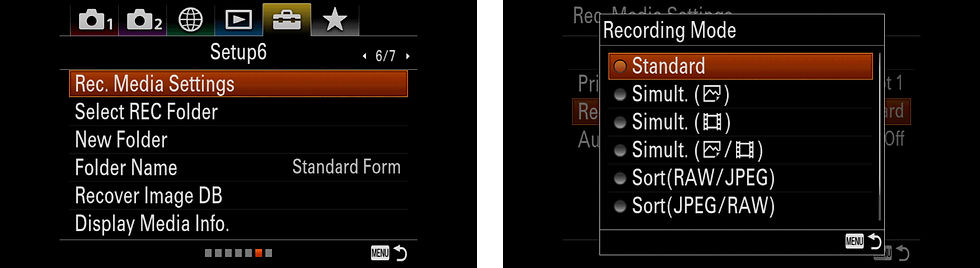
Now, if you're like me and have never had a problem with an SD card, it doesn't make sense to record a copy to the second card while shooting. But that doesn't mean you don't have that option. You can set the 'Priority Support Record' for slot 1, the fastest one, or set the 'Recording Mode' and even activate 'Auto Switch Memory' so that the camera switches cards when you run out of space in the middle of a session without having to worry about it. This problem often happens to me when I'm in the field, distracted taking pictures, and suddenly something happens, and without realizing that the card was full, I end up losing the photo.

The 'Set Support Rec.' setting should be changed in the 'Configuration6' menu (6/7).
Extra Settings
Turn off Audio Signals
If you're like me, you probably hate the various beeps the camera emits, especially when you're out in the field photographing animals. What bothers me the most is the countdown when using the timer. To turn off all these sounds, simply go to "Audio Signals" and turn them off.
This setting is found in the "Custom Operation3" menu (11/11).


Activate Touch Operation
The touchscreen is a great help when trying to focus because it allows you to simply change the focus point by tapping the screen. And it works for both photos and videos, which is great because I can quickly change the focus area without having to scroll across the entire screen with the joystick. By default, the Touch Operation setting on the Sony a7R IV is disabled. With the new Touch AF features the camera has, it's useful to turn on touch operation.
This setting is found in the "Setup2" menu (2/7).


NEW FEATURES IN THE A7R IV
While the Sony A7R IV is quite familiar to many photographers, especially those upgrading from the A7R III, there are several new features that you should set up and learn how to use to truly get the most out of this camera. Here are some of them.
Internal Intervalometer/Timer Shooting Function
For those who like to shoot time-lapses or enjoy capturing star trails, there's an excellent internal function. With this feature, you can set the number of photos you want to take, the interval between shots, and the delay to start the first shot. Then you activate the timer and press the shutter button. The camera will take all the photos you've set up. You can also select the 'Exposure mode' and 'Exposure settings' while in 'Manual exposure.' This means you can adjust the shutter speed, aperture, and ISO sensitivity according to the desired exposure. There's also the option to add a 'Smoothing' effect, which makes it easier to create smoother time-lapses. The camera will automatically merge the files for you. And don't worry if you suddenly need to stop shooting; you can do so at any time by pressing the center button again.


This feature can be found in the "Interval Shooting Function" menu (7/10).
Using the 'Multi-capt. desl. pxl' feature, better known as 'Pixel Shift'
One of the great features you can find on the Sony A7R IV is 'Pixel Shift.' Although the Pixel Shift feature was included in the Sony A7R III, this new version has more tricks up its sleeve. I won't go into great detail about this technique, but basically, most sensors have slight gaps between the pixels they capture, which can force the sensor and internal computer to help fill those gaps using artificial intelligence to match colors and textures. With this technique, the goal is to fill these gaps with RAW pixels by taking four consecutive images and combining them using the internal computer to achieve fantastic images in terms of depth, texture, and color. The only drawback is that you need a tripod, and the scene cannot have any movement, or you'll end up with a blurry photograph. The standard version of Pixel Shift will take 4 images with just 1 pixel of distance between them, ultimately providing a much more detailed final image that reflects medium format quality. A new feature in the A7R IV is the ability to capture a Pixel Shift of 16 images with a difference of 0.5 pixels between each image. This results in a final image of 240 MP after processing the files through Sony's Imaging Edge software. Pixel Shift tends to work best with static subjects that aren't in motion, so keep that in mind!


Another challenge is finding this setting in the internal menus, which can lead to some delays when you want to use it in the field. To have quick access, you can set an external button for this functionality, such as button C4, or place it in your menus. Another location would be to place 'Pixel Shift' in the modes found in the Fn (Function) menu, which you can access by pressing the 'Fn' button on the back of the camera. Either way, this functionality may be one you want to access quickly. I'll talk more about customizing various buttons, including the 'Fn' menu, later on.
Focus Area Color
One of my favorite settings is the one that allows you to change the color of the focus point. Previously, it was set to gray, which was incredibly difficult to see in low-light situations. Fortunately, now we can change the color of these adjustable AF points to white or red. I recommend red because it's easier to see in most situations.


This setting is found in the "AF3" menu (7/15).
Additionally, you can also customize buttons 'C1' and 'C2' to protect photographs. I'll explain below how you can customize these buttons.
CUSTOMIZE YOUR A7R IV
One of the best features in Sony cameras is the ability to customize almost every button and even the system menus. From the buttons on the back of the camera to the 'Fn' menu and even the 'My Menu' menu, there are countless options you can choose to customize your camera. If you do it right, you'll rarely need to open the menus and you'll have more time to focus on shooting than changing settings.
Customize Button Layout
One of the settings I like the most is the ability to customize the entire shooting experience because by changing the buttons I can meet the needs when shooting landscapes, travel, macros, wildlife, and even astrophotography. In previous cameras, there was no such possibility; I had to remember in the field where everything was within the menu. With Sony, I can have my own camera, with the functions I use most and need most when I'm in the field and don't have time to search! If you don't like the default settings, you can switch to the ones that suit you best.

This customization can also be done for when you're shooting and when you're filming, and that really allows you to improve the entire shooting experience. As you know, in addition to shooting, I also do a lot of filming for the YouTube channel. Additionally, you can also change some buttons when reviewing photos, such as rating and protecting photos. To customize the buttons, you should go to the 'Custom Operation1' menu (8/9) and change the first three. But here's the configuration of my buttons.
Photography: Custom Buttons
Control Wheel - ISO
AEL Button Function - Eye AF
AF-ON Button - AF On
Custom Button 3 - Drive Mode
Custom Button 4 - Select Touch Function
Center Multi-select Button - Standard Focus
Center Button Function - Focus Magnifier
Left Button Function - Live View Select
Right Button Function - SteadyShot
Down Button - Silent Shooting
Custom Button 1 - Focus Mode
Custom Button 2 - Focus Area
Focus Hold Button - AF On
Video: Custom Buttons
Control Wheel - ISO
AEL Button Function - Face/Eye Priority AF
AF-ON Button - AF On
Custom Button 3 - Select APS-C S35/Enter With
Custom Button 4 - Select Touch Function
Center Multi-select Button - Standard Focus
Center Button Function - Audio Recording Level
Left Button Function - Finder/Monitor Select
Right Button Function - Gamma Display Assist
Down Button - Picture Profile
Custom Button 1 - Focus Area
Custom Button 2 - AF/MF Control Toggle
Focus Hold Button - Focus Hold
Gallery: Custom Buttons
Custom Button 1 - Protect
Custom Button 2 - Protect
Custom Button 3 - Rating (5 Stars)
Fn Button - Send to Smartphone


Customize the Fn Menu
The second most important customization is the 'Fn' menu. It's the place where you can make some necessary changes quickly, something that is important but not always used. In this menu, you can set up to 12 functions or settings. You can program 12 for photography and 12 different ones for video.
Photography - Top Function
SteadyShot - Turns SteadyShot on and off, useful when placing the camera on a tripod.
APS-C S35 Capt.: Manual - Allows switching between Full Frame and APS-C Super 35.
Subject Detection - Allows switching between 'Human' and 'Animal' when photographing a person and need to change to their pet.
Interval Shooting - Turns interval shooting on and off, must be set in the menu.
Multi-capt. desl. pxl - Turns on 'Pixel Shift,' you must use a tripod and shoot static subjects.
Silent Shooting - Turns silent shooting on and off, useful for photographing animals, always on, but if you want to use flash, I have to turn it off.
Photography - Bottom Function
Flicker-free Shooting - To prevent photos from getting stripes when shooting with indoor light.
Zebra Display - Turns the zebra effect on and off.
Face/Eye Priority AF - Changes the priority to focus on the face or eyes.
Grid Line - Although I always have the rule of thirds on, sometimes it can be distracting.
Support Priority Recording - Choose which card is prioritized.
Touch Operation - Turns touch operation on and off.
Video - Top Function
Audio Recording Level - Adjusts audio recording levels.
APS-C S35 Capt.: Manual - Allows switching between Full Frame and APS-C Super 35.
Subject Detection - Allows switching between 'Human' and 'Animal' when photographing a person and need to change to their pet.
Frame Rate - .
SteadyShot - Turns SteadyShot on and off, useful when placing the camera on a tripod.
AWB Priority Setting - Adjusts white balance.
Video - Bottom Function
Picture Profile - Allows changing the picture profile.
Zebra Display - Turns the zebra effect on and off.
Picture Effect - Changes the effect on the image.
Grid Line - Although I always have the rule of thirds on, sometimes it can be distracting.
Support Priority Recording - Choose which card is prioritized.
Touch Operation - Turns touch operation on and off.
To customize this 'Fn' menu, select the 'Customize Function Menu' function in the 'Custom Operation1' menu (8/9).


Setting up the "My Menu" (star) Menu
There is another menu that we can customize to our liking, it's actually the last menu that appears in the main menu. That is, you can create your own menu with the functions and features you use most. I usually put the functions and features that don't fit in the buttons and in the 'Fn' menu. Here are the functions I registered in this configurable 'My menu':
My Menu 1
Long exposure NR
High ISO NR
Flash Mode
Live View Display
Touch Operation
Ctrl c/ Smartphone
My Menu 2
SteadyShot
SteadyShot Settings
RAW File Type
APS-C/Super 35mm
My Menu 3
Format
Auto Power OFF Temp.
USB Connection
USB Power Supply
PC Remote Settings
My Menu 4
Manual Focus Assist
Focus Magnifier Time
Initial Focus Magnification
FINDER/MONITOR
My Menu 5
Focus Area
AF-C Priority Set
AF Track Sensitivity
Drive Mode
To set up this "My Menu," go to the last tab and 'Add Item' to the various Menus you want to create, I think you can have a maximum of 5 different menus.


Changing the Assigned Name of Images and Videos
Most photographers, myself included, assign names to files when importing them into the computer or Lightroom, allowing some freedom and creativity in naming the files that come out of the camera. The fact that you can change the first three letters of any file created on the camera can be especially useful if you shoot with different cameras or if you're a team of photographers. The default name is 'DSC,' but I like to change it to '7R4,' or 'A7R,' or 'DOP,' or 'WLD,' or "OW4" or even some acronym for different machines all of the same model to know which machine took what. With a little creativity, I can quickly know all these details.
To customize file names, just go to the 'Setup5' menu and 'Set File Name.'
Setting Up Copyright Information
One of the last settings to do is to change the Copyright name that will accompany all the photos you take with the camera. It's very easy to change, just go to the 'Setup5' menu (5/7) and edit the 'Copyright Info,' here you can 'Set Photographer' and also 'Set Copyright,' allowing other photographers to use material from the same company. And so you know who took what after the event. When you're done, don't forget to turn on 'Write Copyright info' and you're ready to shoot.
In addition to adding copyright to images taken with the A7R IV, you should also add the serial number of your camera to your images. This can help you track your camera if it gets lost or stolen.


This setting is found in the 'Setup5' menu (5/7).
Other Accessories
No camera is complete without a few accessories to make our lives easier and be more creative. The following accessories always go with me in the backpack with the A7R IV.
Fast SD Cards
When buying a Sony A7R IV, remember to buy fast cards, with UHS-II. Although it only does 10 frames per second (fps), the truth is that with a 60mp sensor, the buffer has to deal with huge files, especially if shooting in RAW. And if it's in uncompressed format, the final file is around 120mb, while compressed it's 80mb. That is, if you want to optimize buffer performance and see it working at optimal speed, you'll need an ultra-fast card.
I recommend the Sony Tough SDXC UHS-II cards of 64GB and 128GB which have read speeds of 300MB/s and write speeds of 299MB/s.

Remote Controller
There are several solutions for when shooting with a tripod, where you want the camera to shoot without needing to touch it. You can use the 2-second timer or a remote controller, wired or wireless. I like the wired ones because I also use them when I'm in the hide shooting birds, and if I have a wireless one... well let's just say I might lose it in the middle of the session. For other occasions, a wireless remote trigger can be very useful, it's a matter of assessing your needs. What I use is a 'Sony RM-SPR1' cable and it always goes with me everywhere, even if I lose it.

External Power Bank
Most Sony cameras allow you to use an external power bank as a battery, or to charge the battery. This is extremely useful if you run out of battery because a simple power bank that you usually use to charge your phone is enough to keep you shooting for a few more hours. Imagine you're hiking for hours, or you have to drive between locations, you can easily plug in the power bank and charge the battery on the go. The connection cable I use is a USB Type C which is the same for the phone, so I don't need to bring an additional cable.

Leave Your Questions
If you have any questions about the Sony A7R IV, send an email to info@onwild.net or on any of my social media channels. Thank you and see you next mini-guide/review.
Comments